Showing posts with label Technique. Show all posts

Friday, August 30, 2019

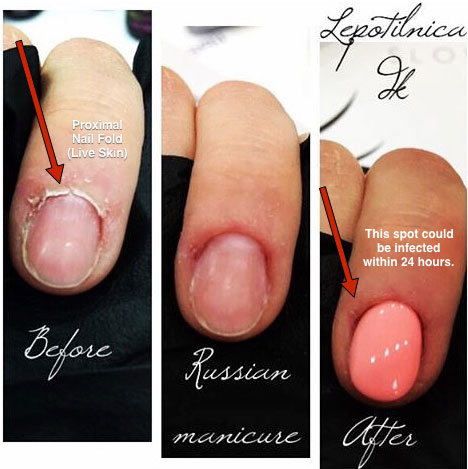
Russian Manicures Part 2 - the Consequences and Experts Weigh In

I mean, seriously, that skin looks raw!
In my first post on Russian Manicures, I discussed a couple different Russian Manicure training videos and broke them down step by step.

In this part 2 of my Russian Manicure post, I will present to you what the experts are saying regarding this technique.

Once again, lets remember throughout this that the Eponychium (actually, we now know this should be called the proximal nail fold (PNF)) is living tissue and should never be cut. From the book "Nanotechnology in Dermatology":
"The skin bordering the proximal nail plate is called the eponychium. It does not end at the nail plate, but instead folds back underneath to create a tight seal which prevents pathogens or contaminants form gaining access to the matrix area... [It] serves to help protect and cushion the matrix. This tissue is often mistakenly confused with the cuticle... The cuticle is a vital part of the seal that protects the matrix from pathogenic invasion, which explains why this area should be treated with care when manicuring."
So, what happens when the "Russian manicure" technique is done on a client? Just like with calluses on feet, the more you cut the PNF , the harder than thicker it will grow back trying to protect itself.

Vitaly Solomonoff, founder and president of the Academy of Nail Art and former editor of Nail Spa magazine in Russia, and his colleagues have studied more than 300 cases of people who have had Russian Manicures. They found that 91% of clients who constantly get the Russian manicure have symptoms of the damaged nail matrix or nail bed. "Only 9% of the cases have been determined as safe and “successful” in a long-term period of study (38 months). All 9% of clients have got the manicure from NTs with basic medical education. So, we come to conclusion that deep understanding of the processes in lively skin helps to train the correct technique of this manicure.... Symptoms may not appear right after manicure is performed, the first symptoms occur months after due the constant repetitive traumatization of the cuticle/matrix area. Symptoms include all signs of matrix/nail dystrophy from splitting, horizontal ridges, slow nail grow to the painful neuropathy and high sensitivity. We have also discovered that infectious inflammations are a common issue in those clients who has compromised immune system – diabetics etc....Imperceptible vibration always takes place even with high end e-files and impacts the highly sensitive matrix area and leads to dramatic postponed issues. The technique that may look safe and easy can bring troubles in the future...We strongly believe that micro cracks of the skin are inseminated with bacteria during few hours after the procedure. "

In addition, Solomonoff has said that "The background of the so called 'Russian manicure' is an attempt of e-files distributors to sell their units in Russia. That is why it has been widely advertised as a safe and 'healthy' alternative to clipping the nail cuticles. We, at my company have always stood against this practice unless NT has at least basic medical education and full understanding of Anatomy and Physiology of the nail unit."


Doug Schoon says "Hopefully, this problem may be self-correcting. When those who use these methods start seeing the reported problems associated with these types of manicures, hopefully they'll wake up and smell the coffee. Excessive damage to the skin around the nail plate, excessive regrowth of hardened callus-like tissue, redness, pain, puffiness, weeping/ water-blisters, itching... these are symptoms I'd expect many will see. Not only can this method cause the expected hardening and rapid/excessive regrowth of tissue, the damaged skin is more likely to develop infections. And, product-related skin irritations or allergies are more likely as well. Invaders beware- watch closely for these issues- and don't blame the products- blame your techniques. I'm already hearing of and seeing these problems."

Whatever, My Clients have had No Problems and LOVE the results

The reason your skin feels "softened" after a Russian Manicure is because the electric file wears away layers of  the epidermis - the very layers that work to keep your skin hydrated - and reveal the new, vulnerable skin underneath - often this can even be the dermis layer of the skin, which is not mean to be exposed to the elements.

Remember, you don't have to bleed in order to suffer damage and damage cannot always be seen by the naked eye. An electric file spins at thousands of revolutions a minute. You can be as light handed as you like but you will still cause damage to the natural nail.

Plus it goes against every principle of good nail health and proper technique.

But, other people are doing it!

And if they were all jumping off a cliff, would you do that too?  

Seriously though, here's the thing - if you are in the United States (and many other countries with regulations on the nail industry), the Russian manicure is a technique that is NOT approved by regulatory agencies nor is it covered under insurance company polices (which means a serious financial risk if you perform the service!). Unregulated countries may be 'allowed' to perform this technique ONLY because there are no licensing requirements or regulations. But even if you can so it doesn't mean you should do it.

Educating your clients about the dangers of the technique and encouraging them to share the knowledge with their friends will help reduce the popularity. Yes, there will still be people who "don't care" and will still seek out the service, but for every person we can educate about the dangers, that is one less person seeking out the service and one less person with damaged nails and skin. We do what we can.

What should we be doing instead?

Regular (preferably weekly) manicures using hydroxy acid based exfoliation products and hydrating masks coupled with a good quality cuticle oil twice a day will take a few weeks but you will see a massive improvement without any mechanical intervention.


References:

https://schoonscientific.com/wp-content/uploads/2017/07/May-17-Doug-Schoon-column.pdf
http://www.newnailcreations.com/links
http://www.salongeek.com/threads/russian-manicure-technique.297841/
https://www.nailcarehq.com/russian-manicure-dangerous/
https://www.nailcarehq.com/the-dangers-of-the-russian-manicure/
https://www.facebook.com/athena.elliott1/posts/10210980427719423


Sunday, May 14, 2017

Russian Manicure Part 1 - Video reviews


If a nail trend has ever given me the willies, its the Russian Manicure (a.k.a combined manicure, Korean manicure, machine manicure). The effect is clean and stunning....and almost always not something that is within scope of a nail tech's license. Having said that, I will say that there are certain parts of the technique that are useful and can be done by a well trained nail tech without damage to the client. But there are other parts of the procedure that literally amount to minor surgery. Lets break this down.


First, a side note. Lets remember throughout this that the eponychium is living tissue and should never be cut. From the book "Nanotechnology in Dermatology":
"The skin bordering the proximal nail plate is called the eponychium. It does not end at the nail plate, but instead folds back underneath to create a tight seal which prevents pathogens or contaminants form gaining access to the matrix area... [It] serves to help protect and cushion the matrix. This tissue is often mistakenly confused with the cuticle... The cuticle is a vital part of the seal that protects the matrix from pathogenic invasion, which explains why this area should be treated with care when manicuring."
Back to our regularly scheduled post:


In the first video, they are using a variety of bits to "clean" the cuticle and eponychium.
  • First, a fine small diamond cylinder bit is used to remove visible cuticle stuck the nail plate. This could be okay, as long as the bit is very fine and care is taken to not over file. There is quite a bit of "dust" on the nail when they do this which is nail plate dust. I don't think that bit is very fine.
  • Second, a needle bit with a blunt edge is used and they instruct you to go "as deep as possible" into the nail grooves. My problem here is that they start pushing under the eponychium to "clean" the cuticle - and in the process are breaking the seal that the eponychium gives to the nail matrix.
  • The third bit is a corundum (stone) bit - which is porous and not disinfectable. You would need to use a new bit for every client. They are using it to smooth the nail plate. This is the third time they have gone over the same area around the sidewalls and eponychium of the nail with a rapidly spinning bit. I don't care how soft the bit is, at this point you are starting to take layers of the nail off.
  • Fourth they use a tiny diamond football (or bullet) to go over again to go even more deeply into the nail folds.
  • A round diamond bit is used to clean raised skin (they keep calling it cuticle but its really living tissue). They also use it to file down the hard, dry skin at the corner of the nails. That makes sense to me, its the same as filing calluses on the feet .

Even worse is the video where they do the same manicure but add scissors. They say that there are 2 instances that you need to use scissors - the first is when your client has "damp cuticle" and is too elastic to get with the machine and the second is for new techs who are not comfortable using the round bit.
  • In this video they show a client with healthy eponychium that is a bit overgrown. They first dry out the moist eponychium with baby powder and then push back the stuck eponychium, (again they keep calling it cuticle, which is wrong)
  • They then use the diamond bit to remove cuticle on the nail plate (which they keep calling pterygium, which is also wrong) and to push up under the eponychum that they pushed back in the first step. Their goal is to raise that eponychium off the nail plate in order to be able to grab it with scissors later. They use the same bit along the sidewalls
  • They powder the skin again to dry it and then use a scissors to cut off the raised eponychium., This is the part where I can't help but cringe.
  • Next they are using a corundum (stone) bit to remove the cuticle that is leftover on the nail plate and smooth the nail plate. Again these bits are porous and not disinfectable.
  • They next use the round diamond bit along the edge where they just cut off the eponychium to further raise the skin "for later cleaning" and then file any raised skin off using the same bit as well as filing down any hard skin on the sides of the nail.
  • They use another corundum (stone) bit to smooth the skin around the nail. 
  • Then they push back the eponychium with a pusher again. How much trauma can this finger withstand??
What are your thoughts on these procedures??

Part 2 of Russian Manicures -  the Consequences and Experts Weigh In coming soon!

Wednesday, November 4, 2015

Enhancement Troubleshooting: Fill Lines and Lifting

There are two types of "lines" that you can see after filling an anhancement. One is a line where there was lifted product that was not completely filed away and another is a red ring from overfiling (called "rings of fire" in the US).  This post will address the first type.

Preventing Lines
Karen from Key West once said on the Beautytech forum: "to get control of fill lines, you have to get control of your product and eliminate the lifting. Fill lines generally happen when there is a teeny bit of   product along the regrowth area that is lifted off the nailplate. If you can  get your product under strict control so it is sealed down all the way   around your cuticle and sidewalls, you'll see the problem will solve itself. "  And frankly, that is the absolute best piece of advice there is when dealing with fill lines.  No lifting = no lines.

To get control of your product we go back to prep, product application (not touching skin - ever) and, for acrylic, mix ratio and not mixing systems.  Any one - or all - of these things could be causing your lifting problems and you need to practice to get them under control. 

I must reiterate - if product touches the skin at any point in your application (even if you remove it right away), you will have lifting. Its a given.  (not to mention the possibility of client overexposure.  But I digress)

Make sure you've reviewed the instructions for your product line...and that you really are doing what they suggest. Another thing that Karen form Key West points out is that too much filing at the cuticle will cause lifting. "If you have  a lump or bump and press the file down on it to file it away, you will   actually force the nailplate down and away from the product, or cause a  lift, in other words. So again, it comes down to control and really   thinking about each bit of product as you work and make sure you have to do   as little filing near the cuticle as possible."


Getting Rid of Lines
OK, so you haven't mastered produt application yet, so how do you remove fill lines?

First, lets address what NOT to do:  DO NOT nip away lifted acrylic, use extra monomer or primer to "soften" or hide the lift, glue down the lift or ignore the lifted area.  These all will cause more problems in the long run, causing yellowing, overexposure, damaging natural nails, exacerbating lifting, etc, etc.

The only real way to deal with lifting, other than complete removal of the enhancement, is by filing
it away.

Karen from Key West has some more advice on how to deal with lifted areas: "One is to file a little bit "behind" the lifted area. Take your file and move it a bit beyond the end of  the lifted area, and file a groove....BE CAREFUL and do not file into the nail plate! But if you watch closely, you will be able to see the line where you are filing lighten, and at that point, take the corner of your nipper and flake away the lifted/filed away area. What you will have left is acrylic that is sealed down to the nail and should not show fill lines.

"Another technique is to  blend what you can, then use one of the adhesive promoter products available to reattach the lifted area. I personally don't use this technique, because I found I was relying on the product to do my blending for me...and I ended  up with nails that had lost their integrity after a couple of fills. But that's me. Another thing you can do is to blend the entire product area so  that it is very thin...and then work on just the lifted spots as above. "
 
Georgette (also from the Beautytech boards) offers this advice: "Fill ins do not start with the fill in. they start with the original product application. Filing flush at cuticle. take the tip of YOUR fingernail and see you feel anything by flicking your fingernail where the cuticle and product meet. If you can feel or hear anything keep filing till there is no dust but do not go onto the natural nail. Then when the nail grows out it will be  sealed and flush. Clients will not be hooking product into the hair etc. "


But I use Cover Powder, so who cares if there are lines?
I am a bit wary with how popular cover powders have become in the last few years.  Yes, its cool to have permenantly colored nails, but you cannot see what is going on under the enhancement.  Greenies?  No idea. Onycholysis? Can't tell.  Damage? *shrug*  I have seen nail techs on Instagram show their prepped nails and it is obvious there is still a small amount of lifting on the nail but becasue they are using cover powder they don't seem to care.

Remember, a fill line is a tiny lifted area and if you are covering it up without fixing it you are leaving an opening for bacteria and water to enter and are also leaving the strength and integrity of the nail compromised so that it is more likely to break or lift in the future.


I will leave you with a Tip of the Week Vicki wrote on this subject many years ago - but, as usual, her advice still stands today

TIP OF THE WEEK #26      FILL LINES by Vicki Peters

One of our biggest challenges is getting those fill lines out when doing pink and white nails. We file and file, get frustrated and finally end up quitting after we see we have filed right into the natural nail and make a big hot spot, making it worse. Can you relate? I can because I did it myself for years.

The only simple solution I have to offer here is if you're having trouble getting those lines out - plain and simple have not done enough filing. Now I am talking the average nail with the average amount of lifting. I am not talking about a set of nails that have yellowed, have major lifting or should have been filled three weeks ago. That is a new set in the making. I am talking about your average client with the average fill challenges.

I know I file better on one side of the nail than the other and you probably do too. So looking at the nail as you file it I can get the left side of the nail down flush and have to work harder on the right side. So what I do is instead of filing the fill in area at the cuticle to a point (Like a upside down V) I file across the nail at the cuticle area from side to side instead. I hold the nail sideways so I am viewing it from the "profile" and I can see that I am not digging into the natural nail and I file from left sidewall to right sidewall, taking all the product off at the cuticle area down about 1/3 of the nail. I can see that I am graduating the acrylic down to the natural nail for no lines.

This may seem silly that I am taking off more product than needed but it does two things here: 1. Get the lines out quickly and 2. Refreshes more of the product keeping the nail more stabilized in the long run. I find that I do less new sets because I kept the nails more refreshed in color and retention by doing more filing.

You also want to file the entire nail and take off 25% of the top surface. This also refreshes the nail and removes any discoloration. When I filled I usually pulled a bit of the pink at the cuticle area over the entire nail replacing that 25% with clean new pink acrylic, which also helps to keep the nails in a more stabilized shape. You can us clear for this as well not worring about pulling the pink over the white.

Now if one of the lines eludes you - you have a few options here:
  1. Most cushioned files are too fat to see what you're doing, use a Flowery Silver Streak thin wood 180/180 board to get into tight spots. Or one similar. CND has some nice wood boards.
  2. Use a file that does not bend as you file with it - you will have more control over what you're doing. EZ Flow has a great 150/150 cushioned that is sleek and can get into tight spots and will not bend. If you're bending your files maybe try a higher grit - you may be pressing too hard trying to do something your file cannot do - so go up one grit and maybe you won't have to press so hard.
  3. Use your electric file instead of your file. Now many of you may be afraid of this and the key is to use a cone bit and keep the bit on the acrylic and off the natural nail. Use a cone that has a tapered rounded edge or the "V" bit from Kupa - yes it was named after me. It is a carbide cone with a flat cut off tip. Diamond cones are good too. I use the "V" bit on my cuticle areas after I have done my shaping. Aseptico and Medicool have some beautiful soft tipped cone bits you may want to try as well.
  4. Use your dehydrator - like CND Nail Fresh, OPI's Bond Aid or a comparable product. If you think you have not filed enough, a way to check is to dust the nail, apply the dehydrator to the nail, quickly, as it is still wet it will give you a window to what the nail will look like when the acrylic is applied. You may have filed enough and don't know it and this is a sneak peek into the future to see if you got the line out or not. Don't be afraid to do this two or three times, just to make sure.
  5. Don't let the dust fake you out. Sometimes we are trying to file the dust  thinking it is a line - so clean it out with your dehydrator and see if it  was only the dust.
  6. Use NSI's Line Out. This is an incredible product and one of a kind.  Follow the manufacturer's instructions and after cleansing the nails apply  Line Out to the fill line. Now I can't express this loudly enough, this is  not the answer to your lifting problems and it should not be used as a  crutch. If you have lifting problems then you need to address your  application procedures. NSI's Line out is for those hard to get places and  should be used wisely. I have used it over a bad-lifting area and later down the line that same lifted area lifted again but now I had encased it  with two fills and had to replace the whole nail eventually. I have used it  when I had a difficult line to get out and it worked perfectly. So be wise when using this wonderful product.
So the bottom line is file more, use your files and bits properly and go the  extra mile and you will be pleased with your results. If you want the  numbers to any of the manufacturers mentioned in the tip of the week - you  can look them up in your Nailpro Gold Book. And when you look them up - go  through the Gold Book again and see what a wonderful source guide it really is. Lots of hard work goes in there and I reference it at least once a day.

DISCLAIMER
Any products mentioned in the "Tip Of The Week by Vicki Peters" is not an endorsement of any kind.

Vicki
The Peters Perspective
"When you stop learning your career ends and your job begins"


Saturday, October 3, 2015

Backfills (French rebalance)

We have discussed the procedure for re-balancing nails (fills) and that all well and good, but what if we have someone who has a Pink & White (Permanent French) look?  The concept of re-balancing is the same, but we have that added step of the grown out white tip to deal with.  There are seemingly as many ways to re balance a French nail as there are companies that make products!  I will present a few of the most common ways here (these methods are the same for both Acrylic Liquid & Powder or Gel nails).

Generally you would begin just like any other re-balance procedure, but with step 2 where you are thinning out and cleaning up the grown out product, you would add in the french re-balancing Prep and then when you apply product you also fill in the white.  Let me show you...

First of all, you do not need an electric file to do a backfill (French Re-balance).  The first method I am presenting is the method the NSI, CND and OPI teaches, which basically entails thinning out the entire enhancement by about 50% (you can use a hand file or electric file; they show a hand file) and then you just reapply a thin layer of product over the entire nail - basically re-building the enhancement just like a full set. One advantage to this method is that it looks like a brand new set every time (which is what you want!)
(This video has a lot of references to the NSI product line, the first video shows the prep and the second shows application - they are the same video I just skipped past all the wordiness :) )
 

Basic Electric File Method - I think that this is the most common method (at least among techs I know). I personally use a barrel bit, but she is using a tapered backfill bit.  There are a lot of ways to carve the smile line with this method.


Tammy Taylor Method - Tammy Taylor uses a thin bit to literally just gouge out the new white growth area at the smile line and fill that in with white.  Many people opt to not do this method because there may be a color difference between the new and old product


Fill Before Cut - Young Nails teaches to basically to a regular fill and then use an e-file to cut the smile line after you apply the pink product. Its basically their counterpart to the Reverse Application.


I hope this helps!

Friday, September 25, 2015

Rebalancing Nails (Part 2 - Procedure)

Now that we have learned why we rebalance a nail in part 1 of this article, lets talk about the actual process of rebalancing. (We will talk about rebalancing a French nail in a later article)

  1. Just like with a full set, we will start with a Client Intake and Analysis.  Now, if this is a long time client our intake may be just a few seconds long, confirming the length and shape of the nails and assessing if there are any major issues. For a new rebalance client we want to take a bit longer, asking questions about the nails, what they are looking for as an end result, what they have on their nails currently and assessing if there are any major issues that need addressing (breakage, cracks, lifting, yellowing, greenies, etc.).
  2. Next we will sanitize our hands and begin the process of preparing the artificial nail for a rebalance.
  3. http://www.nsinails.com
    • Shorten and reshape the nails
    • Thin out the free edge back to the original thickness - it will be thicker after shortening due to the out-grown apex.
    • File over the stress area and taper the sidewalls until flush to the natural nail.
    • Prep all cracks for repair by thinning the area around the crack. Thin all the way to the root of the crack (which is usually down to the natural nail plate). 
    • Thin any areas of lifting until the separated product flakes away and a new seal is found.
    • Thin product until it is flush with the natural nail and there are no areas of lifting visible. Avoid nipping or mechanical force when removing lifted areas – sliding the nipper under a lifted edge and pulling up leads to service breakdown. It can also pull up layers of the nail plate, which will weaken the foundation of the enhancement. Nipping can also lead to onycholysis, and perpetuate excessive filing to remove the ridge left behind. Proper nail care is of utmost importance.  You must do everything you can to protect and preserve the integrity of the natural nail plate
    • Review entire file prep to be sure remaining product is thin and even, and that there is no lifted material left. 
  4. PREP the exposed natural nails.
  5. Apply your chosen product per the manufacturers instructions, filling in the growth area and rebalancing the stress area on all nails and addressing any broken or cracked nails in the process.
  6. File and finish as usual


Pictures from : http://www.nsinails.com/nail-labs/tricks-of-the-trade/rebalancing.html


.


Sunday, September 20, 2015

Fiberglass, Silk and Linen Wraps

Developed in the early ‘80s, nail wraps are thin products made from paper, silk, linen, fiberglass, mesh, or other fabrics applied to the nail for extra reinforcement.  Fabric nail wraps used to be one of the "big" nail enhancements. Nowadays many nail techs aren't even taught them in school! 

However, as clients are moving toward a more natural nail and the trend is short, many nail techs are using nail wraps as a way to give their clients stability while still maintaining a very thin, natural look. Nail wraps are great for clients who are allergic to acrylic or primer, clients who are looking for a very thin nail enchantment, and natural nail repairs. Nail wraps are also great for clients who are giving up acrylics and want to grow out their nails. “When you have acrylics, you don’t have to be too careful with your hands,” says Elaine Watson. “If you reach for something and bang your nail, it probably won’t break. But when you’re going back to natural nails, this can be shocking. When wearing nails with an overlay, you’re going to tend to adjust to them better as they’re growing out.”


The Chemistry of Wraps 
by Doug Schoon, excerpted from http://www.hooked-on-nails.com/chemistry.html

The monomers used to create wraps are called cyanoacrylates and are members of the acrylic family. They are the same monomers used to create many fast setting adhesives such as Krazy Glue.® Professional nail products are specifically designed for use on fingernails and are far superior for this application. These monomers are sensitive to alcohol, water, and weak alkaline substances, and in large amounts they can cause almost-instant polymerization. A drop of water or alcohol on wrap monomers will cause ‘shock cure”. They will harden quickly and turn cloudy white. They turn cloudy because shock curing causes thousands of microscopic crack. They are invisible to the eye, but the cracks will scatter light reflecting from the surface. Small amounts of these substances cause slower, controlled reactions which result in polymers which are clear, flexible and strong. Wraps, however, do not have the advantage of being cross-linked.

Water-sensitive monomers must be protected from moisture in the air which is why they are sold in containers with small nozzles. This prevents air molecules from gelling or thickening the product. As with other monomers, inhibitors are used to prevent gelling. Even so, leaving a container open for too long will thicken the product fairly quickly. You might think this moisture sensitivity is a negative, although it actually is a positive. The nail plate contains enough moisture to polymerize wrap monomers, and just touching the nail plate is often enough to react the monomers. (This is one reason why cyanoacrylates so easily adhere ones fingers together.)

Catalysts speed up the polymerization and reduce cure time from minutes to seconds. Spray or brush-on catalyst causes an almost-instantaneous reaction. The catalysts in wrap systems are generally weak alkaline substances which may be listed as “aromatic amines’. Rapid reactions cause rapid heat build-up. Incorrectly used, these catalysts may heat the nail plate to a blistering 170° F. A small amount of warming is beneficial and will improve strength; however, pain-causing heat may cause serious burns to the nail bed. To avoid over-heating, some catalysts must be sprayed from a distance. Always wear the proper mask when using these systems to protect yourself from the vapors of mists and sprays.

Clients who frequently wet their hands should be warned that all cyanoacrylates are moisture sensitive, and should be instructed to wear gloves whenever possible. This is true of both tip adhesives and wraps.

Choosing a Fabric:
"A lot of new techs are unsure whether they should use fiberglass or silk. I always ask the client first how tough she is on her nails. Is she breaking her nails often? Or only once in a while?  If she says she breaks her nails frequently, then I’ll go straight to a fiberglass wrap because they offer more strength — about double that of silk wraps. But if she says she only breaks or chips a nail every once in a while, then I’ll start her off with silk wraps and take it from there. If she needs more reinforcement we can switch to fiberglass." ~Backscratchers educator Christine Vargas

There are three main types of fiber traditionally used on nails:
Fiberglass: Very strong, cross-weaved fiber but mesh can be seen on the nail if you look closely
Silk: Turns completely transparent when saturated with resin, but not as strong as fiberglass or linen.
Linen: thickest fabric, opaque, very strong but rarely seen nowadays


Application Methods:
  • Tip and Overlay
  • Natural Nail Overlay
  • Natural Nail Repair
  • (Sculpting with wraps is a very advanced technique and not usually done)
Generic Application Procedure: (as always, follow the manufacturers instructions for your chosen product)


  1. PREP the nail as usual - use a very fine grit to remove shine
  2. Lay down a base of resin on the natural nail and apply accelerator as directed by your system
  3. Apply and blend tip if desired - if you are going to apply a tip lightly remove the shine from the free edge of the resin base before applying tip.
  4. Place full strip of chosen fabric on nail, cut to fit with 1/32" to 1/16" space around edges. DO NOT Touch the fabric with your fingers as natural oils will inhibit the resin from penetrating the fabric.
  5. Apply a thin resin, saturating the fabric. Spray activator.
  6. Optional: apply a second layer of fabric or just a 1/4" "stress strip" across the tip line for additional strength.  Apply a thin resin, saturating the fabric. Spray activator.
  7. Apply 1-2 additional layers of resin and activator.
  8. Use a medium-fine file to smooth the nail - do not over file.  Wraps file much easier than acrylic or gel nails.
  9. Use a block buffer and a 3 way buffer to finish the nail.  You may also apply gel polish to finish.


Wrap Removal:
Because wraps are not cross-linked like acrylics, removal time is greatly reduced.  Generally they will come off in around 10 minutes of soaking in acetone.  Of course, this means you also need to be very careful when removing nail polish on wraps and most manufacturers suggest a non-acetone remover so as not to "melt" the resin when removing polish.


Application Video


Some Brands of Wraps:


Much of this article was excerpted from: http://www.nailsmag.com/article/97861/return-of-the-nail-wrap and http://www.nailsmag.com/article/614/wrap-chat


Sunday, September 13, 2015

What the heck are hybrid nails?

Hybrid: noun - a thing made by combining two different elements; a mixture

Simply put, hybrid nails are a combination of different types of systems.  There is no standard definition in the nail industry as to what type of products are being mixed.  Which means if someone says they want hybrid nails, it could mean just about anything and you will need to ask questions to find out exactly what they are talking about.

Some examples of hybrid nails:
  • CND Shellac: Markets itself as a UV Gel - Nail Polish hybrid
  • Tip and Dip systems: a hybrid of wrap and acrylic systems; uses resin and powder to create an enhancement. 
  • AcryGel/Powder Gel:  (not to be confused with gel powder which is just clear acrylic) - this is a hybrid of UV Gel and Acrylic. It is similar to a tip and dip system except instead of resin there is a thin UV gel and instead of dipping, you spoon on the powder.  Le Chat and Star are two well known brands.
  • Nuni Torres Method [I don't know what else to call these :)] Instagram star and Boss Nails tv show alum, Nuni, uses a thinner acrylic layer on the nail bed and then sculpts the tip with Gel, going over the acrylic on the nail bed with the gel as well.


Have I missed any other types of hybrid nails you have come across?  Comment below!

"Tip & Dip" Systems

Every 5 years or so, nail dip systems pop back up.  This year its Signature Nails Systems (SNS) and Dip It. Sally Beauty sells their ASP system. Star nail has their So Fine system. When I was active in the business it was Backscratchers Extreme and Glitz and Glamour.  There are many, many other brands and they have been around at least since the early 80's (when it was know as a "French Dip" nail)- no matter what SNS (or any other brand) tries to sell you, this is not a new type of system!

These systems are often known within the industry as "Tip & Dip" systems because the process is just that - apply tip and then apply adhesive and dip the nail into a powder.  They are great for women who have become allergic to traditional acrylic since they are not chemically the same as traditional acrylic, natural nail repairs and "temporary" nails for proms and such.  They are easily and relatively quickly removed by soaking in acetone.

This system is not an acrylic system.  It is closer to wraps than liquid and powder acrylics because it is a resin based system.  You could consider it a hybrid of wraps and acrylics since the the main components are resin adhesive, like a wrap, and a fine inert powder, like acrylic.   I like to point out that the powder is inert because it does not have any additives in it like acrylic powders, which means you would not be able to use it with monomer.  Likewise, it is not a good practice to use traditional acrylic powders with this type of system as you cannot predict how the additives would react with the resin or resin accelerator.  Likewise, if you mix systems you cannot guarantee the outcome - yellowing, cracking, heat spikes and allergic reactions are all possibilities.

Generic steps:

  1. Sanitize your clients hands and PREP the nail
  2. Apply a base layer of resin adhesive
  3. Apply a tip, if desired. Blend if a natural tip or just remove shine if a white tip.
  4. Apply a layer of resin and tip the nail into powder; brush off excess powder
  5. Apply another layer of resin and dip again; brush off excess powder
  6. Apply last layer of resin and spray or brush on resin activator.
  7. File and finish nails.


Pros of Dip Systems

  • Easy to apply
  • Easy to learn
  • Fast application
  • Very thin


If they have been around so long, why aren't they more popular? (Cons)
As a resin based system, dip systems have similar "cons" to wrap systems.
  • Resins are simple polymers and not very water or solvent resistant. 
  • They have a tendency to become brittle and yellow over time and develop spider cracks after a couple of fills.  (This is why many techs recommend them only for "temporary" applications.)
  • Can be cloudy or grainy looking if you use the wrong powder (like regular acrylic powder) or do not brush off excess powder.
  • Can be unsanitary if clients all dip in the same tub of powder.  This can be overcome by putting only the powder you will use for your client in a small dish and when done, throw away and leftover.
  • Nails can be flat.  A more experienced tech can learn to build up the nail in layers and sections but this negates the "ease of application" in the pros section.
  • Hard to re-balance a French tip
  • Not as strong as gel or acrylic.
  • Often seen as an "unprofessional" product

Backscratchers Extreme Video


Wednesday, September 9, 2015

Shaping Nails - Beyond Square

Shaping an enhancement in this day and age is much harder than it was 15 years ago when 90% of people wanted basic square nails!  There are five basic shapes: square, round, oval, squoval, and pointed. In the last several years, variations of these shapes - and new shapes all together - have been added to the list - everything from Lipstick, to Coffin/Ballerina to Edge and even Duck Foot nails!

Lets start with the basic nail - the square.  Many of you are thinking, "yeah yeah, I can do a square nail", but the square nail is actually the basis in all other shapes so let's review it. To best file a square nail to shape, use a medium-grit file to shape  the side walls first. File the side wall straight up and then change the angle to blend. Repeat this on the other side.  Then, holding the file straight against the edge of the nail - either vertically or horizontally - file the free edge straight across.  Then turn the client’s hand around so her fingers are pointing "up" and you are looking at the nail and straighten the free edge from that angle When looking at it the file should be perpendicular to the nail to achieve the hard square.  One tip I was given many years ago that has stayed with me to this day is to keep your elbow by your side when filing sidewalls!  If your elbow sticks out, your sidewalls will not be straight.  Its simple but so effective.

Once you have a square nail, it is just a matter or changing the angle of your file at the free edge to start shaping into most other shapes (extreme shapes such as duck foot, lipstick or edge are the exception to this rule). As an example,  for a squoval nail, instead of holding the file at a 90 degree angle to the nail, we angle it down a bit.  The more we angle, the rounder the tip becomes and if we hold it nearly flat under the nail we end up with an oval nail.

Watch the videos below and watch how Elaine Watson angles the file to get the perfect shape to the tip.


Filing Almond Nails

Filing Square Nails


Filing Round Nails

Stiletto and pointed nails are popular right now, but you cannot use the beveling method to get those shapes. The best advice I have for them is to visualize a line going down the center f the nail all the way to the edge of the tip. Now, use your file to "draw" the sides of a triangle from each side to meet at the point where you visualized the center of the nail at the free edge.  Use the same number of strokes and the same pressure on each side.  You need to make sure the top of the lines (at the hyponychium) are directly across from each other - you are basically visualizing a triangle.

Similarly, ballerina or coffin nails would be done the same way except in stead of coming to a point at the center, the angles would end the same distance from the center. You could visualize a longer triangle that ends off the free edge OR you could start with a stiletto and then "cut off" the tip, but you would have to start with making the nails longer to begin with.

The below video show sculpting a stiletto nail and filing into shape.
Build and File a Short Stiletto Nail


I hope this helps you start thinking about shaping the nails in a different way, By using your high school geometry you can learn to make some gorgeous shapes! (and you said you would never use geometry!)


Monday, September 7, 2015

Filing and Finishing Nails

After you apply your product of choice, your next step is to file and finish the nails to smooth, shape and refine.
For this post, I am going to copy/paste a "Tip of the Week" circa 1999/2000 from the great Vicki Peters (RIP, we miss you!). 

Two notes: 1. She mentions acrylic but any enhancement can be finished the same way. 2. If you prefer, you can apply a gel seal coat (finish gel) and cure per manufacturer's instructions after step 8 instead of smoothing and buffing the nail.

TIP OF THE WEEK #5  - FILING TECHNIQUES
by Vicki Peters
As a request from Jill Johnson and an e-mail to the list from Janie Robles last week I though that a tip on filing techniques was in order. What I am going to do is describe my filing system and under no means is it the end all system for everyone. I am just sharing mine - which works for me. Everyone needs a filing system or a system for anything if you think about it. A filing system can save you time and keep you focused - which will give you better results.
A story first.
My sister Diane had her license for a few months when I visited and she did my nails for me. After applying the acrylic she went to file them and pulled out four black files. She spent 15 minutes filing in no special order picking up one file after another and switching back and forth from nail to nail. She was making me nuts and not getting the job done. I took all four files away from her and asked her to identify the grit on each one as to which was coarser. She did not know. What she was doing was flipping back and forth between a 100 and 180 files sometimes using the 180 first then the 100! She would file one nail, then move on to the next and then go back again. She had no system. So I took the 100 grit file and told her to file all ten nails, then I gave her the 180 and told her to do the same thing. She saved time and was much more effective with a system she was now developing.
Vicki's filing system:

AFTER THE ACRYLIC IS APPLIED
I use a 100 grit file. I like the larger thinly cushioned files that are square ended. I like these files because I do not like files that are too cushioned or bend. I cannot get a clean line from a file that bends. However for the finish a cushioned file will hug the nail better. I also like a large board because I can get more surface contact, which allows me less filing time.
Another thing I do which may be wasted time and acrylic to some but works for me is I build every nail square even if I intend to make it round. I get straighter edges in my final nail this way.
STEP 1 - Parameter
Just like in a haircut you must file a guideline. Take your 100 grit and file the tips of the nails all straight and the same length. Hold your file straight up, not at an angle in which will make the tip inverted or at angle under that will undercut the corners off. Flat to the tip's edge.
STEP 2 - Measure the nails
Nail to nail, cuticle to tip - forget about the smile lines not lining up - that is another tip of the week! The thumbs and pinkies should be in proportion and the index, middle and ring nails should be the same length.
View the nails from the top - do not turn them so the hand is pointing up and do not turn them around and measure the size of the free edge that you can see over the tip of the finger - this will sure mess your length up because not all nails are on the fingertips at the same exact place.
Measure now at this step and you won't need to worry about it later.
STEP 3 - File the sides
Viewing the nails from the top with the file straight up and down - holding the file straight - not at an angle - file the side shapes of all ten nails.
STEP 4 - File the undersides.
Turn the nail so you are viewing the underside of the edge of the nail in a nail profile position - where it leaves the groove wall and becomes the free edge extension. With the file tucked into the groove wall and with the file touching the whole edge of the underside of the nail where is may have an overhang, file the underside edge of the extension. File both sides of the nail so now you should have all clean edges.
NO FLIPPING THE FILE!
Most techs try to achieve the last two steps in one stroke and wind up flipping the file around as they file. This does not make a straight sidewall edge and ruins the corners. So if you flip the file try using my two steps for filing the sides. Using a file that bends too much by applying too much pressure trying to get a straight edge will also be difficult to achieve a straight line.
STEP 5 - Making round nails
At this point if you want to round the nails take your file and press it flat - up to the tips' edge, then angle the file so is slips slightly underneath the edges allowing you to remove the underneath corners of the tip.
Then after taking the corners off shaping the nail round will be easier and more consistent.
STEP 6 - Shaping the top surface
Now with your 100 grit file go over the surface of all ten nails. I stay away from the cuticle and focus on lower BE of the nail down to the tip.
STEP 7 - The cuticle
Now I would do all ten cuticles.
STEP 8 - The "V" bit
I then take my Kupa "V" bit - yes named after me! And refine the cuticles. The "V" bit is a medium carbide cone with the tip cut off so it is small and flat so it fits right into the cuticle area. I view the nails from a profile so if there is a "humpage" at the cuticle I can remove it and have a nice clean blend of acrylic down to the natural nail.
STEP 9 - 180 grit file
Now I repeat all the steps I did with the 100 grit file with my 180 file to refine what I have already done. This makes for a consistent shape.
Sometimes if I have made really smooth nails I use a 150 file for both steps eliminating some time and achieving the same results. I don't always make smooth nails tho!
SECRET TIP - one thing you need to do in between grit changes is to remove the dust left behind by the coarser file. If you try to use a 180 to smooth the nails after using a 100 grit you will file into the nail the 100 grit particles left behind - gaining no ground at all. Sop don't forget to remove the grit dust in between switching files
STEP 10 - The white block
Again, dust the nails and use the coarse side of a white block, or your favorite block. Make sure you are graduating grits - some blocks can be coarser than you think. Make sure you go over the entire surface smoothing the nails completely. Go underneath and smooth the edges too - without re-shaping the edges. Use a good amount of pressure when doing this.
STEP 11 - The white block again with cuticle oil
Dust the nails again and apply cuticle oil and rub into the cuticles. Most oils you would use for buffing will be mineral oil based cuticle oil, perfect for buffing, but will not penetrate the cuticles as well as some other natural ingredient cuticle oils. Another words cheap oil is better. With the softer side of the white block buff the nails again to graduate the surface smoothness. Yes you will ruin the buffer but they are super cheap when purchased in bulk.
STEP 12 - Chamois or 3 way buffers
Wipe the nails clean with a dry cloth or towel, you want to remove the excess oil without removing it completely. Use a three-way to get a high shine or a chamois buffer.
I use two chamois buffers. Now don't give me grief about sanitation here - if you want to use a clean one wash them in the dishwasher or buy one per client. I use a chamois with EZ Flow buffing cream on all ten nails. Use a good amount of pressure without heating the nails up - so keep an eye on that. Then I use a clean chamois with less pressure to bring the shine up even higher.
If you graduate your grits properly, use the right files and make sure each file covers the entire nail when filing you should be able to high shine a nail without a three-way buffer.
Vicki
DISCLAIMER
Any products mentioned in the "Tip Of The Week by Vicki Peters" is not an endorsement of any kind.

Gel Nails (aka Hard Gel) Application

I want to post this note up front so it doesn't get lost - it is very important to remember that the thickness of the gel coating has a great effect on the degree of cure. Many techs mistakenly believe that because gel is so clear that thickness doesn’t matter, but light will not penetrate thick layers to cure the gel fully. It is much better to use three or four thinner coats rather than one or two thicker coats. Thinner coats allow more light to penetrate the layer, thereby reducing shrinkage as well as minimizing any heat buildup. Thin layers also allow the gel to fully cure, minimizing the possibility of overexposure. Opaque gels are even more susceptible to under curing if the layers are too thick. Keep them thin!

1. Proper PREP
2. Apply forms or apply tips if desired
3. Follow your manufacturer’s instructions on priming the nail – depending on the manufacturer, you may prime with a liquid primer or you may use a base gel applied thinly and cured on the nail. Some brands use a liquid primer followed by a base gel.
4. Apply gel, curing between each layer. There are many, many ways to apply gel. I will post some videos below. The most important thing to remember is to use the correct lamp for your system and to apply the layers thin. They do not have to be as thin as polish but you cannot build a nail in one coat either or you will risk under-curing. This is fantastic video on lamps and the chemistry of gel
5. After the last layer and before filing, remove the sticky inhibition layer using your manufacturer’s recommended cleansing agent. Apply the cleanser to a lint free pad and with firm pressure, wipe each nail from cuticle to free edge. DO NOT “scrub” back and forth on the nail. Remember, the inhibition layer is uncured gel and should never touch skin – “scrubbing” the nail to remove the inhibition layer will push the uncured gel into the cuticle area.
6. Finish file the nail.
7. Cleanse the nail with the manufacturer’s cleanser to remove any dust and oils from touching the nail while filing.
8. At this point, you can do a number of things…You can apply a finish gel and cure to create smooth glass like nails. You can apply a gel polish to the nails, following the manufacturer’s instructions. You can also buff the nails to a more natural matte finish or a 3-way buffer shine (which is usually less shiny than using a finish gel).
Just a note on finishing: If I am using regular nail polish (not gel polish) I will buff the nails to remove scratches, but not to make them shiny - my polish last longer than if I use a finish gel which is very smooth and polish wears off the tip much easier.
Application Videos:
I always suggest following the manufacturer’s instructions on your chosen product. They developed a method that works with their products and helps you to get the feel for that product. However, if you have been using a product for some time and feel like your techniques could use some refining, it never hurts to see what other people do . Just remember that the techniques of other brand work with that particular brand and may or may not work well with the one you are using. The viscosity (thickness) of the gel plays a huge role in how application works.

Young Nails

Masterworks

Tammy Taylor

IBD

CND
LCN


What Are Gel Nails (aka "Hard Gel")?

Gel nails are an extremely natural-looking enhancement that are thin, clear, flexible, non-yellowing, nonporous and resist lifting. Gel nails can be used for natural nail overlays, tip overlays, and sculpted onto forms, and to help encapsulate a damaged free-edge as it grows out.
Benefits of Gel Nails:
1) Odorless
2) Natural Feeling
3) Thin
4) Flexible
5) Crystal Clear
6) Light Weight
7) Natural looking
8) No lifting!
Myths about Gel Nails:
1) Myth: Gel nails are soooooo easy to do, they apply just like nail polish! Anyone can do them! The truth: "Gel nails are easy to learn, but hard to master".
2) Myth: Gel nails are "lumpy" because you can't file them or do finish work. The truth: Gel nails are non-porous and completely cured, there is no reason not to file them to perfection if needed!
3) Myth: Gels are Healthier than Acrylics. Truth: A long time ago a rumor started that acrylics could cause cancer and it spread like wild fire. Through persistence and education, the nail industry has been able to overcome this misconception; however the myth still lingers. Acrylic chemistry has proven to be non-carcinogenic and similar chemical components are used in the biomedical and dental industries. Both gel and acrylic products are safe if used according to the manufacturer’s guidelines.
4) Myth: Acrylics are Damaging to the Natural Nail & Gels are Not Truth: 99% of damage to the natural nail is caused by techs using mechanical force during prep and application. Improper PREP can be done with either gel or acrylic, it is not exclusive to on or the other. The chemistry of both products is very similar and neither damage the nail by themselves.
5) Myth: Acrylics are Stronger than Gels Truth:When gels were introduced to the market, many techs experienced service breakdown which lead to the misconception that gels weren’t as strong (durable) as acrylic. It is important to understand that the breakdown they were experiencing was caused by improper application techniques, not product failure.

Some common mistakes that techs make when applying gel enhancements are 1 - too thin of an application-proper thickness and placement the apex is essential and 2 - using poor quality or old UV lamps or bulbs. All too often techs spend money on high-end gels for optimum performance, then buy the cheapest UV lamp from a no-name manufacturer at a tradeshow. UV energy is of utmost importance in ensuring a complete cure and prevention of service breakdown. Not all lamps, or bulbs for that matter, are created equally. When using gels, it is best to use a high-quality lamp from a manufacturer you know and trust and don’t forget to replace the bulbs every 4-6 months! When applied properly, gel is equally as “strong” as acrylic. In fact, gel can be more resistant to cracking because of its slightly greater flexibility AND the viscosity of gels can make the proper bond more error-proof because the gel will naturally seep into all of the macro-crevices of the natural nail. Acrylic requires the tech to use a mix-ratio to achieve the proper bond. Using too-dry of a mix is a sure way to experience service breakdown with acrylic. No mix ratio is required for gel application.
*****
When I first started in the nail industry in 1999/2000 I came across Gel Nails, which is not something we discussed in school. My Gel Guru at the time was Barb of Nailsplash (http://www.nailsplash.com) and much of this post is synopsized from her (as well as a few other places). She taught me so much about Gel Nails at a time when gels were just coming into vogue and I am forever grateful to her. She still has so much information out on her site (I have no idea if she is still active in the nail industry unfortunately). I encourage anyone interested in gels to visit her site (be aware she is quite wordy :))

Liquid & Powder Acrylic Application

There are as many methods to applying acrylic as there are manufacturers of acrylic. Remember, as will most things in life, there is not one “correct” method, just one that works best for you. However, no matter which method you use to actually get the acrylic on the nail, there are some things that are consistent.
1. ALWAYS do proper preparation
2. ALWAYS follow the manufacturer’s instructions regarding priming, mix ratio and product usage.
3. NEVER touch the skin with product or your brush (which contains product)
4. NEVER Dip your brush back into the raw monomer and use it to “smooth” the acrylic. If you add it right after laying the bead on the nail, you will mess up the mix ratio. And once the acrylic is on the nail for a few seconds the monomer will no longer incorporate into the bead and you will then have raw monomer seeping into the client’s nail plate and skin.
Steps to applying Acrylic – 
1. After Priming the nail per the manufacturers instructions (if needed), pour a small amount of monomer into a glass dappen dish — use only what you will need for the particular service you are performing.  (If the liquid becomes thick or murky part way through the service, discard it and get fresh liquid!)
2. Totally immerse and ‘swish’ your brush in the monomer to thoroughly wet the hairs and to remove any trapped air that may result in bubbles in the finished product
3. As you remove the brush from the dish, flatten hairs on both sides to shape the brush for sculpting and to drain excess liquid from the brush. More monomer = a larger bead, less monomer = a smaller bead.
4. Draw a line in the powder to the depth of the liquid line on your brush. The longer the line, the bigger the bead. A proper mix ratio will not immediately ‘melt’ down, it will have a slight ‘textured glass’ appearance, and maintain its shape when placed on the nail, tip or form.
5. Place the bead on the nail and lift your brush from the bead, giving your bead a second to settle while you wipe the excess liquid from your brush.
6. Apply using your preferred method. I have listed and referenced the most common methods below.

“Traditional” 3 ball method – Uses 3 balls or beads of product to build the nail – One for the free edge, one for the stress area and one for the cuticle. This method has the advantage of being able to build in the shape of the nail while sculpting, using various brush angles: 


and

also, 
… Skip to 1:50 for application. This is a great video that shows how working slower can actually make you faster by reducing filing time to nearly nothing.

4-ball method (Tammy Taylor method) 

(skip to 21:50 to see the application). Similar to the three ball method, this method also adds a 4th ball to the stress area to build it up and make it stronger and more arched.
Reverse method: Championed by Young Nails, this method lays down the nail bed before the tip. This is a great method for a crisp smile line.
 and

One-Ball method: I’ll be honest, I had a hard time finding a video that didn’t show way too many “no-nos”. This one is short but she doesn’t touch the skin or overuse liquid. The point with the one ball method is speed, but it is very hard to master getting that perfect arch at the stress area and thin cuticle with this method.   

Also see here for another example: https://instagram.com/p/7Dc-RcyVt_/
Nail biter methods: The main issue with nail biters is getting the tip or form on the nail. Below are some methods on this technique:
Sculptures: 

Tips: 

No matter which method you use, the cuticle area seems to be the hardest part to do! Here are some great Cuticle Application Tips by Greg Salo at Young Nails (notice how his perfect mix ratio means he is never “chasing” the acrylic on the nail)

Join the conversation: what is the hardest part about laying acrylic for you? Which is your preferred method?